Step Up With Dancer Pose: The Nataraja!

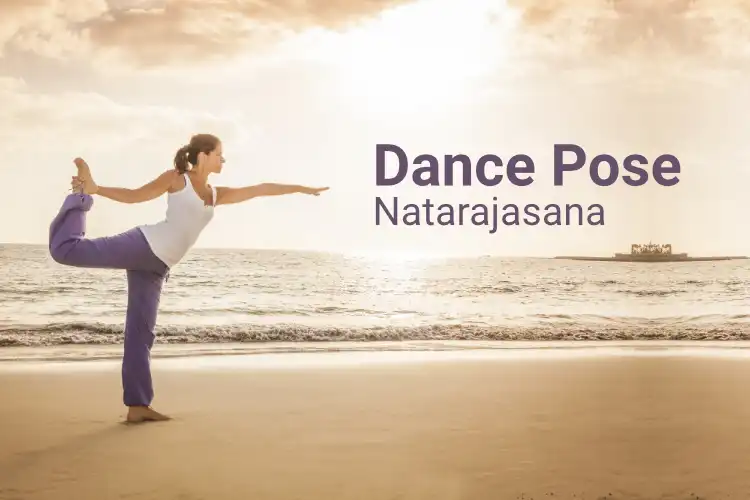
In ancient times, there were several activities that could make a person fit. Be it playing sports, doing hard physical work or even dancing. Yes, dancing can be one of the ways to stay fit. There are several dancing poses that can be related to yoga. One such pose is the Dancer Pose Nataraja. Natarajasana meaning originates from the Sanskrit word “Nat” means dancer, and “Raja” means king. This dancer pose is also called the king dancer pose or nataraj asana. This pose originates from the Bharatnatyam and is often related to Lord Shiva.
This is often told as a beautiful pose, and the pose style, stretching and balancing act develops concentration and balance. Many yoga experts believe that this pose has tremendous grace and power, comparing the balance and the tension in the arms and the legs like that of an archery bow. The Nataraja pose can be beautiful to see, but it can be difficult to achieve. So before performing this pose, let us see the significance of the pose. Before you practice any yoga pose, take the help of an expert to avoid any mishap.
Table of Content
Significance of Natarajanasana Pose
The Natarajana pose is considered an advanced pose with a difficulty level of intermediate. This requires repeated practice to perfect this pose. The main focus is on flexing the middle back in order to take hold of the foot. The stretch of the legs and arms go beyond the normal, and it helps in strengthening the respective muscles. This is a basic standing pose, and it focuses on the core stretch, back bend, balance and strength. The main muscles in focus are the Lower back, biceps, triceps, hamstrings, chest, hips, psoas and quadriceps. It is kind of a complete pose that stretches all the main body parts. This pose can be related to Vatta according to ayurveda because the body balances on one leg and floats in the air. There are many sequential poses that can be lined up with the dancer pose. Let us go into depth about how to perform this yoga.
How To Perform The Dancer Pose Yoga?
It is a standing pose, so begin your preparation by standing tall in the mountain pose or the Tadasana. The upper body weight should be equally distributed on both legs. Take a deep breath. Know your dominant side, either the right side or the left side. Accordingly, shift the weight and pose.
- For right-side dominant people, shift the weight on the right foot. Slowly flex your left knee to lift the left foot over the floor. The left knee should be close to the midline throughout the pose.
- Hold the left foot distal end with the left hand. The thumb is resting on the sole of the foot and pointing in the direction of the toes. Then life the right arm straight upwards towards the ceiling.
- Lift the left leg behind and move your upper torso forward to counterbalance. Remember, the left knee should be close to the midline and should not spray haywire. The right arm should also move forward with your head and shoulder.
- Now pull the left leg upward with the help of the left hand to further stretch the back. This will put a lot of tension on the back. People with back problems should not try this pose.
- Set your eye line forward straight so that you are able to concentrate on one point, and this helps in balancing the pose.
- Hold this position for 5 to 10 breaths.
- Then slowly reverse back and settle down again on tadasana. Now repeat this pose on the other side.
Beginners make the common mistake of not being able to balance the pose and transferring the bodyweight on the leg. It is important to spread the toes on the supporting foot. The knee should not be locked or hyperextended, or overly flexed. The quadriceps should be engaged to keep the supporting knee soft. The knees and hips should be in collateral lines and aligned. Call a yoga expert and know the eligibility for this pose.
Modifications And Variations
This is an advanced phase, so if you want to master this pose, then you should start practising the first level of this pose by simply raising the leg by holding it from behind with your arms. Let us check a few modifications that will help to master the pose.
- The main thing is to balance; for balancing, you can use support. Either a wall or even a partner who can position and hold the balance for you will help you to stay stable.
- The second thing is raising the legs up. According to the flexibility, the level of leg raising will vary. If you are finding it difficult to raise the leg due to stiffness in the back, then ask the partner to tie the ankle and the thighs together upwards. Constant supervision is needed for this.
- Next comes the hips. If the hips are not flexible, then one can start the practice by bringing the foot into the elbow, twisting the lower back a bit and then raising the leg supporting, it within the elbow.
- For a good stretch, one can raise the leg in the air and press against the wall to get a better grip and balance.
- You can also use forward support like a chair or some kind of block to the level of your waist. Take the help of the support, and you can lift the left leg in the air without taking too much stress.
Dancer pose handwheel, Dancer pose with Chair, downward dancer pose touching the hand on the floor are a few of the modifications and variations one can try. Let us see the benefits of this Natarajanasana pose.
Benefits Of The Natarajasana Yoga
As already mentioned in the significance section, this asana targets the overall muscle strength starting from the shoulder, chest, hips, back and legs. Let us see the dancer pose benefits in detail.
- While you stretch the leg beyond the level of the hip, the hamstring, calf and quadriceps muscles of the elevated leg get stretched.
- The hip muscles get toned with the backbend of the lower back and the thighs.
- The arms and shoulder muscles get toned.
- The overall stretching exercise helps in the expansion of the chest, thus creating more space for vital air.
- This is one of the asanas that utilised the full spine and related muscles.
- Yoga poses are always regarding creating focus and concentration. Setting the eye line forward at one point increases the concentration.
- Few ayurvedic experts believe that it can heal chronic joint pains and works on the human back. This is excellent for people in sports, mainly in athletics or physical contact sports.
- The advanced level of Natarajasana helps in activating the thyroid gland.
- As the chest and the abdominal area is stretched to the maximum, it helps in improving digestion.
- It opens the Psoas muscles as a counter to tight hips that develop while sitting.
Though this pose has several benefits, there can be certain negative points also. Let us know when not to use this pose.
Dancer Pose Contraindications
This yoga pose is one of the advanced level poses and should be practised under the supervision of an expert. This pose requires tremendous flexibility of legs, hips and arms. Anybody having difficulty in stretching these organs might incur injury. A person having a spine injury or slip disc should avoid this pose completely. Another contraindication is carpal tunnel syndrome that requires the twisting of the wrists.
While trying this pose, it helps if you try initially with a partner. Partner will help to balance on one leg. He will not let you topple off the ground. Once you have mastered this balancing act, you can continue with this pose on your own. The Dancer pose Natarajasana requires intense back bending, strong balance, and open shoulders that will require time and practice for you to master this pose. It is always advisable to call an expert before you try any yoga pose. Yoga can give intense health benefits, but if you do not follow it correctly, then this might lead to injury. Be safe and be wise. Call an expert Yoga teacher and start living a healthy life.
Read More:-
Simple Yoga Postures For Beginners
26 Postures for Hot Yoga
28 Yoga Postures You Should Try Today


